


A skin illuminator has become an essential tool in modern skincare and makeup routines, offering a subtle way to enhance your natural radiance without relying on heavy makeup or artificial shimmer. Unlike traditional highlighters that sit on top of the skin with obvious sparkle, a quality skin illuminator works with your complexion to create dimension, reflect light strategically, and give the appearance of healthy, well-rested skin. This approach aligns perfectly with the growing preference for skincare-first beauty that prioritises genuine skin health over temporary coverage. Whether you're building a minimal routine or refining an established regimen, understanding how to incorporate illuminator effectively can transform your daily approach to radiance.
What Makes a Skin Illuminator Different
The distinction between a skin illuminator and other glow-enhancing products matters more than many people realise. Highlighters and illuminators serve different purposes, with illuminators designed to blend seamlessly into the skin rather than create obvious shine.
Formula Composition and Light Reflection
A skin illuminator typically contains finely milled light-reflecting particles that diffuse rather than concentrate light. These particles are significantly smaller than those found in highlighters, allowing them to integrate into your skin's surface for a natural finish.
The best formulas combine these optical elements with skincare ingredients that genuinely improve skin quality over time:
- Hyaluronic acid for plumping hydration that enhances light reflection
- Vitamin C derivatives that brighten skin tone from within
- Peptides that support skin structure and firmness
- Antioxidants that protect against environmental damage
This dual-action approach transforms illuminator from a cosmetic product into a functional part of your skincare ecosystem. Rather than simply masking dullness, it addresses underlying factors that affect radiance.
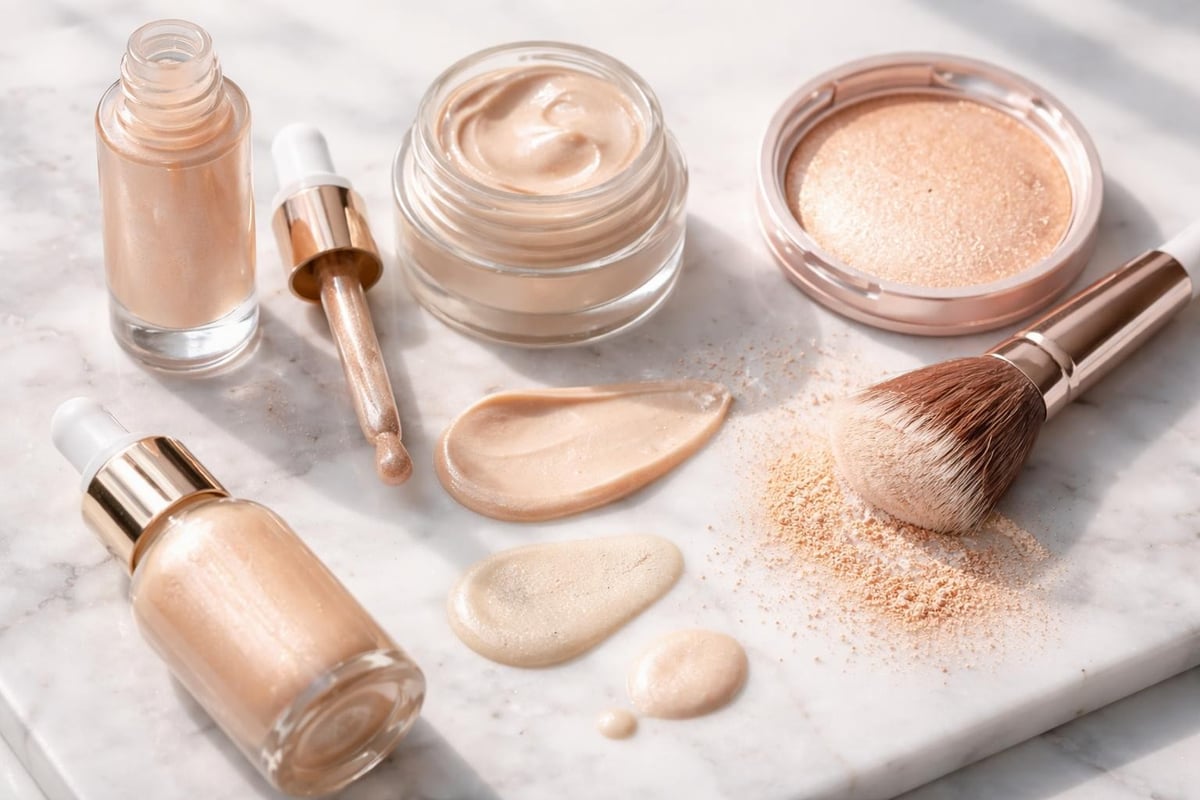
Texture Variations and Their Applications
| Texture Type | Best For | Application Method | Finish |
|---|---|---|---|
| Liquid | All skin types, mixing with foundation | Fingertips or sponge | Dewy, natural |
| Cream | Dry to normal skin | Stippling brush or fingers | Soft, buildable |
| Powder | Oily or combination skin | Fluffy brush | Subtle, matte-adjacent |
| Serum | Skincare-focused routines | Patting into skin | Lit-from-within |
Each texture delivers illumination differently, and your choice should align with both your skin type and where the product sits in your routine. Liquid and serum formulations integrate most naturally into skincare steps, while cream and powder options work better as final touches.
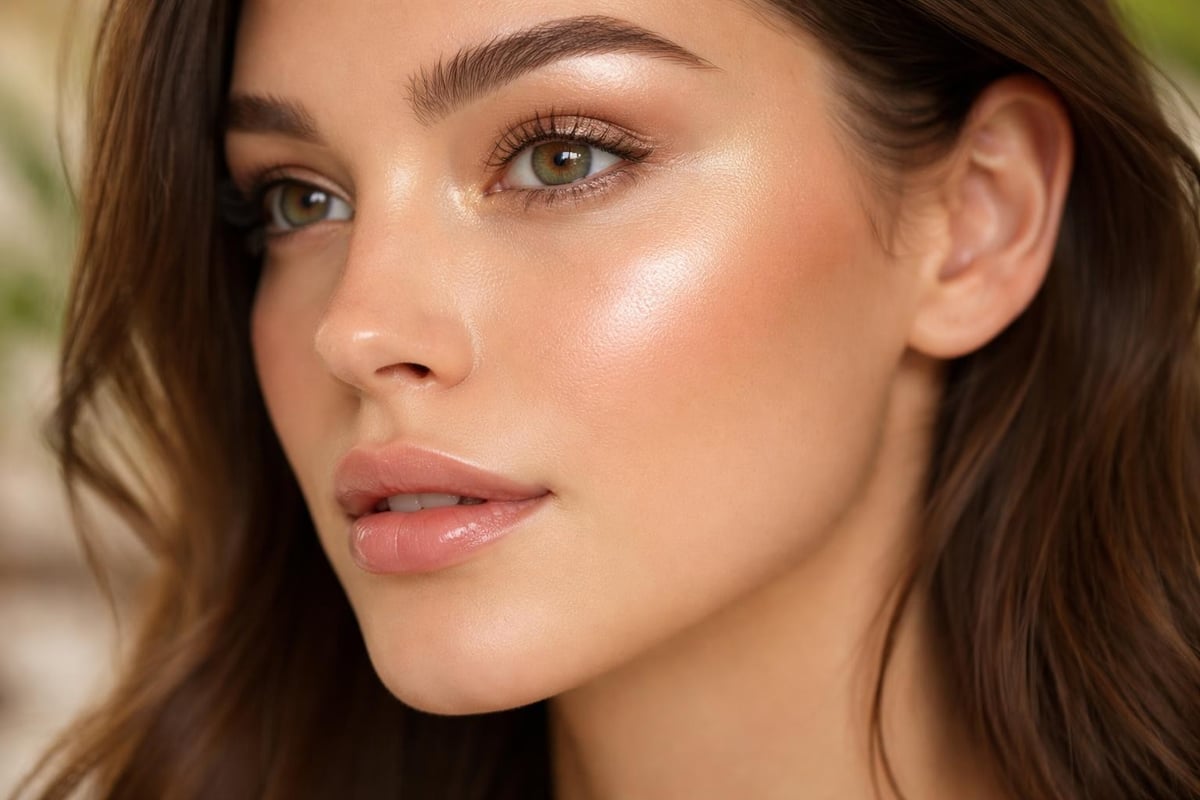
Strategic Placement for Maximum Impact
Where you apply illuminator determines whether you achieve a subtle glow or an overdone appearance. The goal is always to enhance, never to announce.
Facial Architecture and Light Points
Your bone structure creates natural high points where light would naturally hit. These areas should guide your placement strategy.
Start with the cheekbones, applying illuminator just above the highest point rather than directly on it. This creates lift and dimension without looking painted. Move to the brow bone, using a light touch just beneath the arch where shadow naturally falls.
The bridge of the nose receives illuminator only if it's naturally prominent. Applying product here on a wider nose can create unwanted emphasis. The cupid's bow and inner corners of the eyes are universally flattering zones that open up the face and create freshness.
Body Application Beyond the Face
Skin illuminator works beautifully on collarbones, shoulders, and shins for occasions when you want cohesive radiance. The same principles apply: target high points and blend thoroughly.
For body use, choose formulas with staying power that won't transfer to clothing. A setting spray designed for makeup can help lock illuminator in place while maintaining its reflective properties.
Application tips for body illumination:
- Apply to completely dry skin after moisturiser has absorbed
- Use broader strokes than you would on the face
- Build gradually rather than applying heavily at once
- Blend edges thoroughly to avoid demarcation lines
- Allow two minutes to dry before dressing
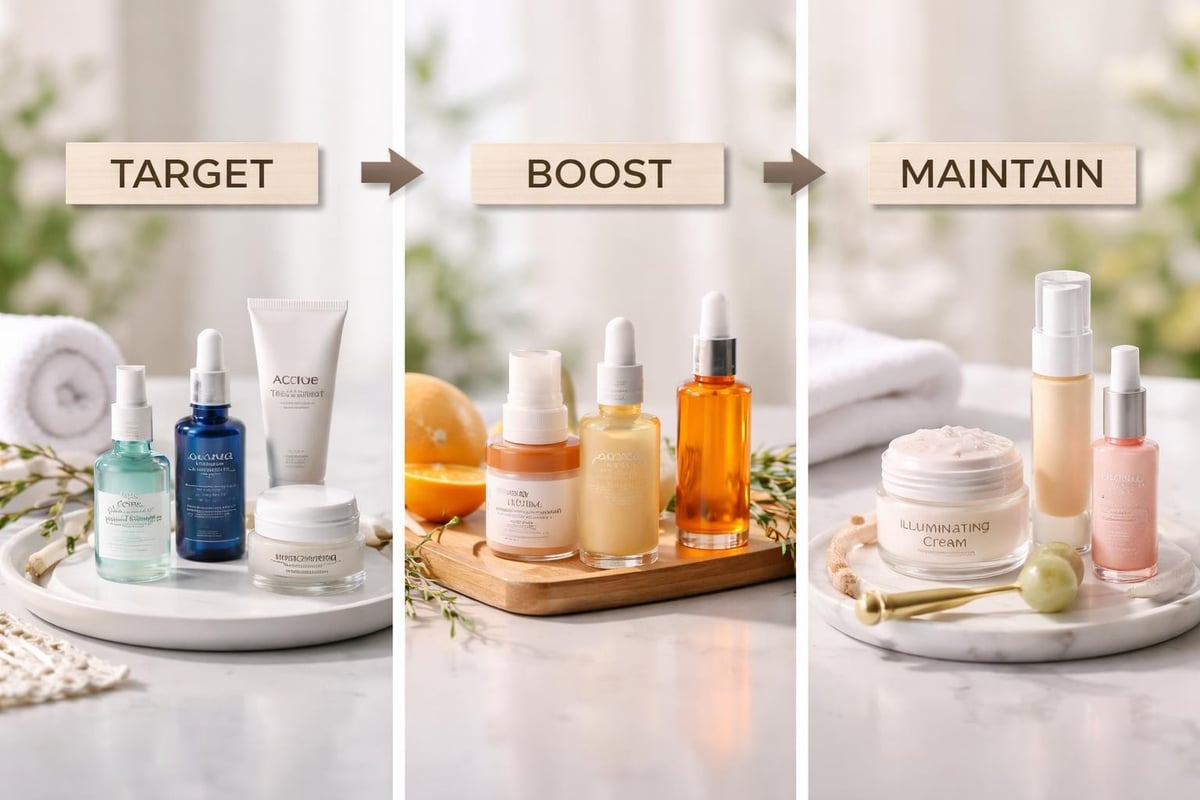
Integrating Illuminator into a System-Led Routine
A structured approach to skincare means every product serves a specific purpose within your broader routine. Illuminator fits most naturally into the "maintain" category, supporting the appearance benefits created by targeted treatments.
Layering with Treatment Products
When you're using active treatments that target specific concerns, illuminator should complement rather than interfere with those products. Apply treatments first, allow them to absorb fully, then add illuminator to areas that benefit from enhanced radiance.
For targeted concerns like dark spots or uneven texture, precision treatments deliver concentrated actives exactly where you need them. The Routine. Peptide MicroPatch exemplifies this approach with dissolving micro-tips that carry brightening and smoothing ingredients directly into marks, stretch lines, or textured zones you want to improve. This controlled delivery method allows you to target specific areas with clinical precision, creating a more even base that responds better to illuminating products.

After targeted treatments have done their work, skin illuminator enhances the improved tone and texture they've created, rather than attempting to mask ongoing concerns.
Morning Versus Evening Application
The role of illuminator shifts depending on when you apply it. Morning application focuses on creating a polished appearance that lasts throughout the day, while evening use can support skin recovery during sleep.
Morning illuminator protocol:
- Apply after serums and moisturiser but before SPF
- Choose lightweight formulas that won't pill under sunscreen
- Focus on high points that catch natural light
- Layer under makeup or wear alone for minimal days
Evening illuminator approach:
- Select treatment-focused formulas with active ingredients
- Apply more generously to support overnight skin processes
- Prioritise hydrating and repairing ingredients over light reflection
- Allow skin to absorb fully before sleep
Application Techniques for Natural Results
Proper illuminator application requires technique that differs from standard makeup application. The goal is seamless integration, not obvious placement.
Tool Selection and Method
Your application tool dramatically affects the final result. Fingers offer the warmth needed to blend cream formulas seamlessly, while synthetic brushes work better for liquid products that need even distribution without absorption.
For powder illuminators, use a fan brush or small tapered brush that deposits product lightly. Dense brushes pick up too much product, creating intensity rather than subtlety.
Blending techniques by formula:
- Liquid: Pat with fingertips or press with damp sponge
- Cream: Warm between fingers, then stipple and blend
- Powder: Sweep lightly, building in thin layers
- Serum: Press into skin using flat of fingers
The key to all techniques is building coverage gradually. One light layer that you can assess and adjust always outperforms heavy initial application.
Mixing with Other Products
Skin illuminator becomes incredibly versatile when mixed with foundation, tinted moisturiser, or primer. This creates an all-over glow rather than targeted highlights.
Start with a 1:4 ratio of illuminator to base product, mixing on the back of your hand before application. This ensures even distribution and prevents patchy results. You can adjust the ratio based on how much radiance you want, but always err on the side of less until you understand how the combination performs on your skin.
Mixing illuminator with skincare works particularly well when you want radiance without any makeup feel. Add a pump to your moisturiser or facial oil for subtle luminosity that looks entirely natural.
Choosing the Right Illuminator for Your Skin
Not every skin illuminator suits every complexion or skin type. Your selection should consider your skin's specific characteristics and how the product will integrate with your existing routine.
Undertone Matching
Illuminators come in various undertones that either harmonise with or clash against your natural colouring. Warm undertones (golden, peachy) suit those with yellow or olive-based skin, while cool undertones (pink, silver) complement pink or neutral complexions.
Universal illuminators with neutral undertones work across most skin tones but may lack the perfection of a precisely matched shade. Test products in natural light when possible, as artificial lighting can misrepresent how the product appears in real-world conditions.
| Skin Tone | Recommended Undertone | Avoid | Best Finish |
|---|---|---|---|
| Fair | Pink, champagne | Golden, bronze | Subtle pearl |
| Light-Medium | Champagne, soft gold | Heavy silver, bronze | Soft sheen |
| Medium | Golden, warm bronze | Stark white, cool pink | Warm glow |
| Deep | Bronze, copper | Light pink, pale gold | Rich radiance |
Addressing Specific Skin Concerns
Different skin concerns require different illuminator approaches. Dry skin benefits from hydrating cream formulas that add moisture while reflecting light, preventing the emphasised texture that powder products can create.
Oily skin performs better with powder or gel illuminators that don't add to surface oil. Look for formulas with mattifying elements alongside light-reflecting particles, creating glow without grease.
For mature skin, avoid illuminators with large shimmer particles that can settle into fine lines. Instead, seek finely milled formulas that create diffused radiance without drawing attention to texture. Skincare-infused options with peptides or antioxidants provide both immediate radiance and long-term benefits.
Acne-prone skin requires non-comedogenic formulas that won't contribute to breakouts. Mineral-based illuminators often work well, as do products that incorporate skin-calming ingredients alongside their glow-enhancing elements.
Common Application Mistakes to Avoid
Even quality skin illuminator fails to perform when applied incorrectly. Recognising these common errors helps you achieve the natural radiance you're seeking.
Over-Application and Obvious Placement
The most frequent mistake is applying too much product or placing it in too many locations. Strategic illuminator use means choosing two to three focal points maximum, not highlighting every potential area.
When you apply illuminator everywhere, you remove the dimension it's meant to create. Light needs shadow as a contrast point. If everything reflects light equally, nothing stands out and you simply look shiny rather than radiant.
Start with less product than seems necessary. Build slowly, assessing after each addition. Remember that illuminator appears more intense in indoor lighting than it does in natural light, so apply in similar conditions to where you'll be wearing it.
Ignoring Skin Preparation
Illuminator magnifies whatever's beneath it, making proper skin preparation essential. Dry patches become more obvious when topped with light-reflecting products, as do rough texture or excess oil.
Pre-illuminator skin preparation steps:
- Cleanse thoroughly to remove oil and debris
- Exfoliate gently to smooth surface texture
- Apply treatment products for specific concerns
- Moisturise adequately for plump, hydrated skin
- Allow all products to absorb before illuminator application
This foundation ensures that what you're illuminating is skin worth highlighting. Rushing through preparation undermines even the best illuminator formulas.
Seasonal Adjustments for Year-Round Radiance
Your illuminator strategy should shift with environmental changes that affect skin behaviour and appearance preferences.
Summer Application and Formulation
Warmer months bring increased oil production and humidity that affects how skin illuminator performs. Lighter formulas prevent the greasy appearance that can result from layering rich products on already-dewy skin.
Gel and serum illuminators work particularly well in summer, providing glow without weight. If you prefer powder formulas, apply them over a mattifying primer on areas prone to shine, reserving cream illuminators for naturally drier zones like cheekbones.
UV exposure changes skin tone throughout summer, potentially requiring illuminator shade adjustments. As skin darkens, you may need warmer or deeper tones to maintain the same natural integration you achieved with lighter shades.
Winter Formulation and Placement
Cold weather strips moisture from skin, making cream and liquid illuminators more appropriate than powder versions. These formulas add beneficial hydration alongside their light-reflecting properties.
Winter's flat light means you can apply illuminator more liberally without appearing overdone. The reduced natural brightness creates opportunity for enhanced glow that reads as healthy vibrancy rather than excessive shine.
Focus winter illuminator application on areas that become particularly dull in cold weather: cheekbones, bridge of the nose, and centre of the forehead. These zones tend to lose luminosity first when skin becomes dehydrated.
Building a Complete Radiance Routine
A skin illuminator performs best as part of a complete system rather than as an isolated product. This ecosystem approach ensures every product supports the others' performance.
The Role of Targeted Treatments
Before illumination comes correction. Treating underlying concerns like uneven tone, texture irregularities, or dullness creates the foundation that illuminator enhances rather than attempts to disguise.
Precision treatments deliver active ingredients to specific areas that need improvement, while maintenance products keep overall skin quality high. Understanding illuminator's purpose helps you position it correctly within this framework as an enhancement tool, not a corrective one.
Maintenance Products That Support Radiance
Daily maintenance products create the baseline skin quality that allows illuminator to truly shine. Hydrating serums, protective antioxidants, and barrier-supporting moisturisers all contribute to the natural luminosity that illuminator amplifies.
Choose maintenance products that address your specific skin needs while supporting light reflection. Ingredients like niacinamide improve overall tone, making illuminator more effective. Hyaluronic acid plumps skin, creating better light-catching surfaces. Vitamin C brightens from within, reducing the amount of topical illumination needed.
Key maintenance categories:
- Hydration: Keeps skin plump and light-reflective
- Protection: Prevents damage that creates dullness
- Tone evening: Creates uniform base for illumination
- Texture refinement: Smooths surface for better light reflection
Advanced Illuminator Techniques
Once you've mastered basic application, these advanced approaches help you customise results for different occasions and effects.
Custom Mixing for Unique Finishes
Creating your own illuminator blends allows precise control over intensity, undertone, and finish. Mix different illuminator shades to perfectly match your current skin tone, or combine cream and powder formulas for dimensional finish.
Blend illuminator with facial oils for an ultra-natural effect that looks like bare skin radiance. The oil helps particles distribute evenly while adding beneficial fatty acids that support skin health. This technique works particularly well for photography, creating glow that reads beautifully on camera without looking made-up in person.
Multi-Step Illumination
Layering different illuminator textures creates depth that single-product application can't achieve. Start with a serum illuminator mixed into moisturiser for base radiance, then add cream illuminator to high points, finishing with powder illuminator for targeted intensity.
This approach mimics how light naturally interacts with skin, creating multiple levels of reflection rather than flat shine. Each layer should be thinner than you'd apply if using only that product, building translucent radiance rather than obvious coverage.
Learning proper illuminator use includes understanding these layering techniques that professional makeup artists employ for editorial and runway work. The same principles scale down beautifully for everyday application.
Illuminator and Skin Health Connection
The relationship between illuminator and genuine skin health goes beyond cosmetic enhancement. Quality formulas support skin function while creating immediate radiance.
Ingredients That Do Double Duty
Modern skin illuminators increasingly incorporate active ingredients that benefit skin beyond their optical effects. Peptides support collagen production, antioxidants protect against environmental damage, and hydrating ingredients improve barrier function.
This evolution transforms illuminator from purely cosmetic to functionally beneficial. When selecting products, prioritise formulas that list skincare actives alongside light-reflecting particles, ensuring your illumination routine contributes to rather than detracts from skin health.
Look for illuminators containing:
- Vitamin E for antioxidant protection and smoothness
- Squalane for hydration without congestion
- Niacinamide for pore refinement and tone evening
- Peptides for firmness and structure support
- Botanical extracts for calming and nourishment
Long-Term Radiance Strategy
True radiance comes from consistent skin health practices rather than relying solely on topical illuminators. A comprehensive approach addresses nutrition, hydration, sleep quality, and stress management alongside targeted skincare.
Your illuminator enhances the results of these foundational practices, making good skin look its absolute best. When you treat illuminator as the final polish on already-healthy skin rather than a solution for skin concerns, you achieve natural-looking results that withstand close inspection.
Consider illuminator the reward for diligent skincare rather than a shortcut around it. This mindset shift ensures you're building genuine skin quality that requires less enhancement over time, not more.
Troubleshooting Common Illuminator Issues
Even experienced users encounter problems with skin illuminator application and performance. Identifying solutions keeps your routine running smoothly.
Addressing Patchiness and Uneven Application
Patchy illuminator typically results from inadequate skin preparation or incompatible product layering. When illuminator clings to dry patches or skips over oily zones, the issue lies in the base rather than application technique.
Exfoliate regularly to create smooth surface texture that allows even product distribution. Use a hydrating toner or essence before illuminator to create a receptive base that products glide across uniformly.
If patchiness persists, check product compatibility. Some illuminators don't layer well with certain primers or foundations. Test different combinations to find formulas that integrate seamlessly.
Managing Excessive Shine
When illuminator crosses from radiant into greasy-looking, you've either applied too much product or chosen the wrong formula for your skin type. The solution involves both immediate correction and future prevention.
Blot excess with a tissue, pressing gently rather than wiping. This removes surface product without disturbing what's beneath. Dust translucent powder over the area to tone down intensity while maintaining some radiance.
For future applications, switch to a lighter formula or reduce application amount. Remember that illuminator intensifies throughout the day as your natural oils emerge, so starting subtle prevents afternoon shine overload.
Dealing with Product Transfer
Illuminator that transfers to clothing, phone screens, or hands indicates either insufficient setting or formula choice issues. Cream and liquid illuminators require setting with powder on areas that contact objects frequently.
Apply a light dusting of translucent powder over illuminated areas, using a soft brush to avoid disturbing placement. This creates a barrier that locks illuminator in place while maintaining its reflective properties.
For body illumination, choose formulas marketed as transfer-resistant or long-wearing. Allow adequate drying time before dressing, and consider a setting spray designed for body makeup to increase staying power.
Professional Applications and Special Occasions
Special events call for elevated illuminator techniques that create impact appropriate to photography and increased attention.
Photography-Optimised Application
Camera flash and professional lighting interact differently with skin illuminator than natural light does. Products that look perfect in person may appear chalky or overly intense in photos.
For photography, choose illuminators without SPF, as mineral sunscreens can create white cast in flash photography. Apply more conservatively than seems necessary, as camera flash amplifies reflective properties significantly.
Photo-ready illuminator placement:
- High points of cheekbones only, avoiding area near nose
- Centre of forehead, blended toward hairline
- Brow bone beneath arch, avoiding area close to eyes
- Cupid's bow, keeping product off rest of lips
- Bridge of nose only if very subtle and well-blended
Evening and Dramatic Looks
Evening lighting is more forgiving than daylight, allowing bolder illuminator application. However, the goal remains enhancement rather than obvious sparkle.
Layer illuminator more heavily than daytime application but maintain the same strategic placement. The increased intensity reads appropriately under dim lighting while still appearing natural rather than costume-like.
Consider adding illuminator to shoulders, décolletage, and other exposed skin for cohesive radiance that extends beyond the face. This creates a polished appearance that looks intentional and elegant.
The Future of Skin Illumination
Illuminator technology continues evolving, with innovations that blur the line between skincare and cosmetics even further.
Emerging Ingredient Technologies
New light-reflecting technologies move beyond simple mica and pearl to include advanced optical diffusers that interact with skin in sophisticated ways. These create multi-dimensional radiance that changes with viewing angle and lighting conditions.
Skincare actives in illuminators become more sophisticated as well, with time-release systems that provide benefits throughout the day and targeted delivery that ensures ingredients reach appropriate skin depths.
Expect to see illuminators that adapt to skin tone throughout the day, formulas that respond to UV exposure by increasing sun protection, and products that use microbiome-supporting ingredients alongside light-reflecting elements.
Personalisation and Custom Formulation
The trend toward personalised skincare extends to illuminators, with brands offering custom shades, undertones, and ingredient combinations. This ensures perfect integration with individual skin characteristics rather than one-size-fits-all formulas.
Technology may soon allow at-home analysis that recommends specific illuminator formulations based on skin tone, undertone, concerns, and environmental factors. This scientific approach to radiance creates results that truly enhance rather than simply adding shine.
Skin illuminator transforms from a simple cosmetic into a strategic tool when you understand its proper role within a complete skincare system. The key lies in choosing formulas that support skin health alongside their optical benefits, applying them with technique that enhances rather than masks, and integrating them into a routine where every product serves a defined purpose. Routine. Beauty builds exactly this type of system, where targeted treatments address specific concerns, boosting products enhance skin response, and maintenance formulas like illuminators preserve and amplify the results you've created. Explore how a structured, simplified approach to skincare creates the foundation for genuine, lasting radiance.

